

Contents
Plex Was Hacked: PMS Gone!
Plex is a popular streaming media platform used to, among other cases, organize your personal video and audio content. I had been using it with my Netgear ReadyNAS for decades.
On August 24, 2022, the maker of the Plex Media Server (PMS) software announced that their proprietary database of about 30 million customers was hacked where usernames, emails, and hashed passwords — but not credit card information — was obtained for 15 million of its users. Talking about a bad day of PMS cramps.
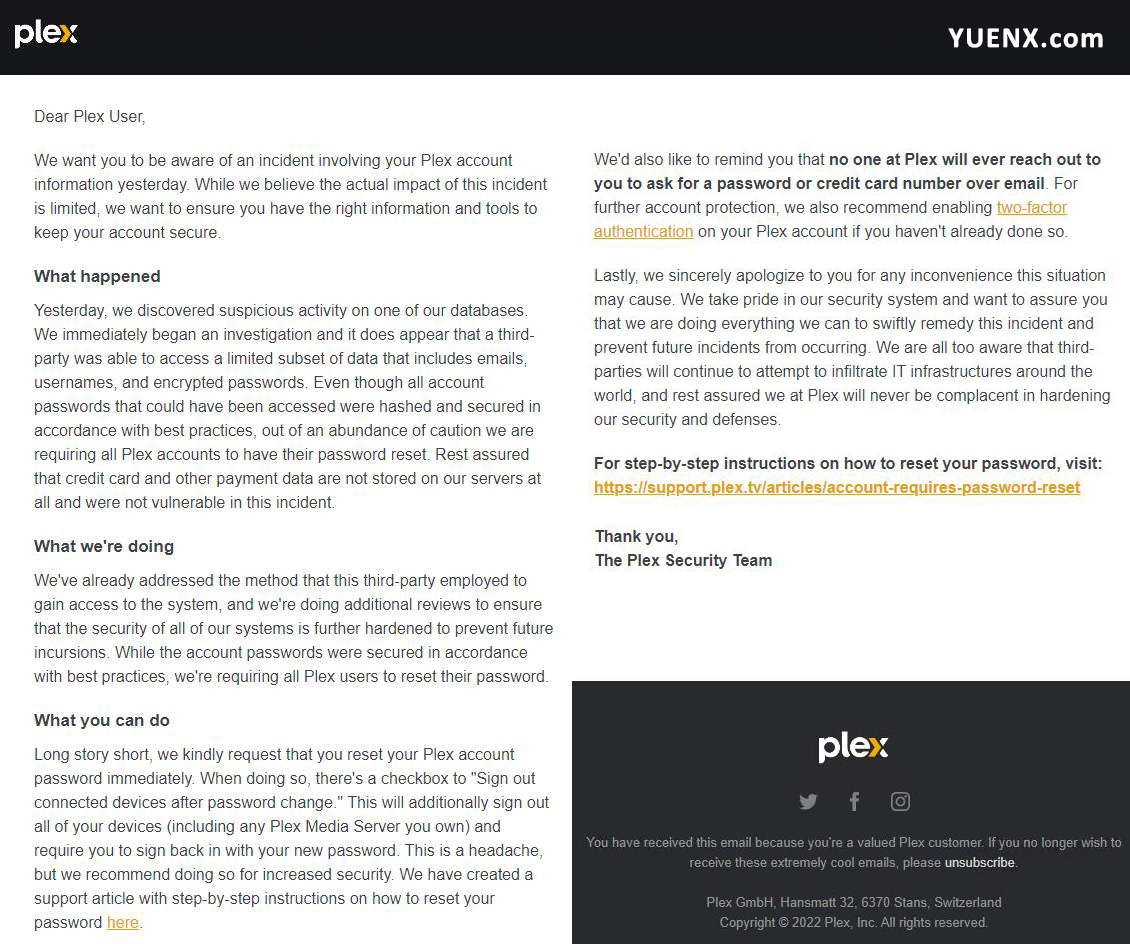
Plex Database Breach Notification Email
Password Change
The company urged its users to reset their passwords and enable two-factor authentication (2FA) as an additional step to securing their accounts. Authy, Microsoft Authenticator, and Google Authenticator are excellent apps for the latter part.
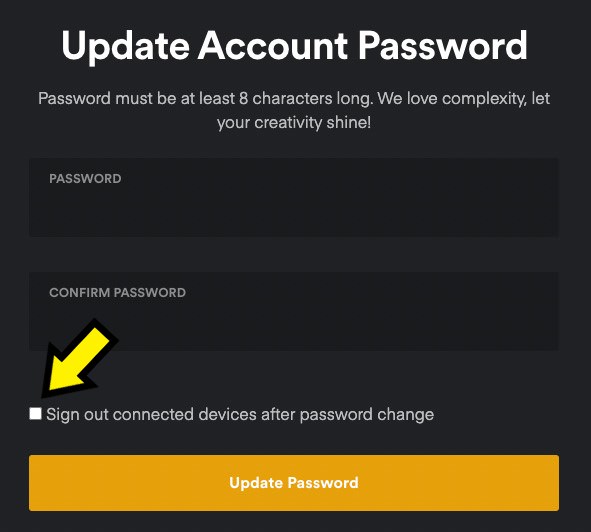
Password Change: Sign Out All Devices
For good measure, there is an option to “Sign out connected devices after password change” to ensure no unauthorized device may still be logged in with your account. I complied.
If you changed your password, your Plex Media Server may have suddenly disappeared along with all your Media Library. Read on to find out how I fixed mine.
Plex Media Server Missing
One morning, I discovered with much horror that all library videos were missing from both my brother’s and my PMS. Nowhere in the Plex Web App or Plex Media Players was an option to connect to one of the Media Server instances hosted by our Netgear ReadyNAS.
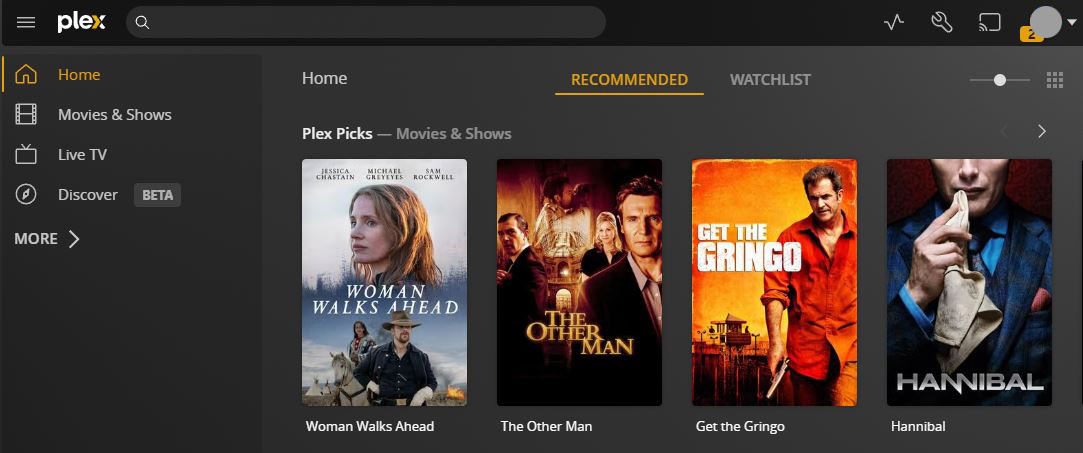
Media Server Content Missing
What happened? Did I just lose all my Plex configurations and associated Media Libraries? Will I have to spend hours to set everything up again?
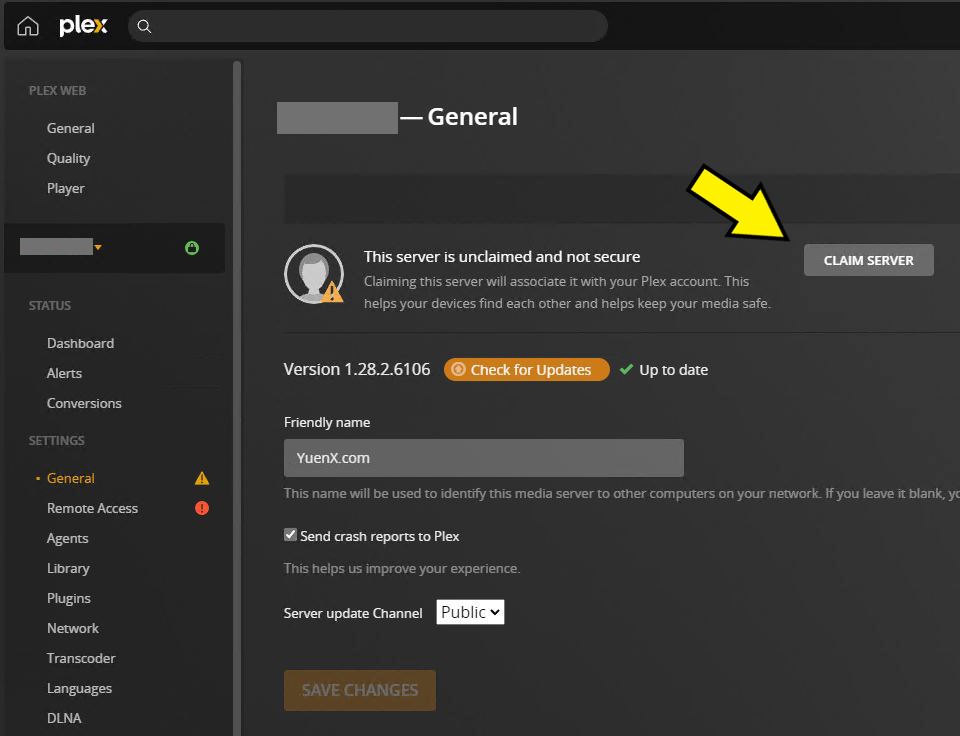
As it turned out, the Plex Media Server was running fine on both of our NAS devices. What did occur was that both servers became “Unclaimed” when “Sign out connected devices” was checked during the password reset of my Plex account. In other words, they got orphaned.
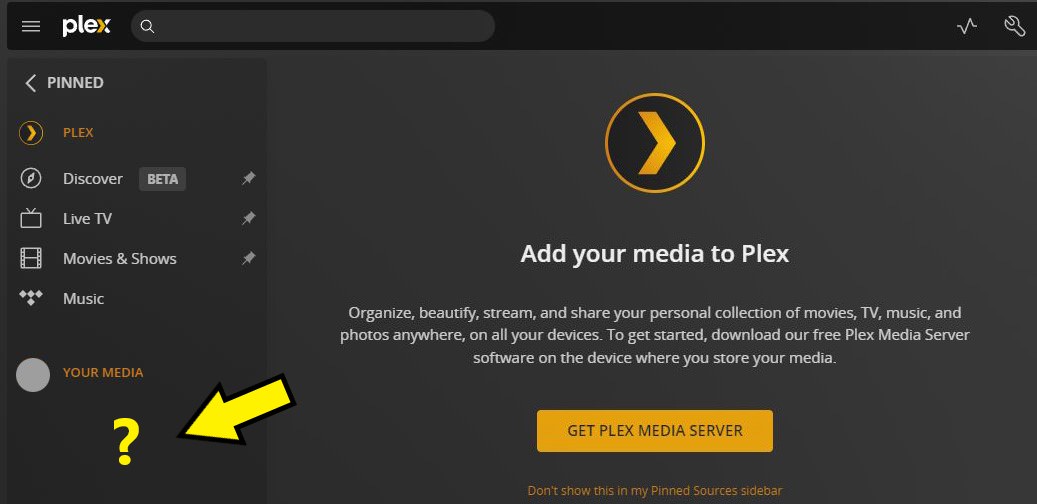
Plex Media Servers Missing
The Fix
There are two options available to solve the issue with the Media Library missing:
- Start over by installing the latest version of the Plex Media Server software and re-creating the Media Library
- Safest but most time-consuming path to take
- Modify the Preferences.xml file to reclaim PMS
- Requires technical know-how and may run into the risk of data loss
I chose to go with the second option.
Modify Preferences.xml
Warning: The solution presented here is very technical and potentially dangerous! Always make a backup of all your data and configurations, consult an IT professional as needed, and proceed at your own risk!
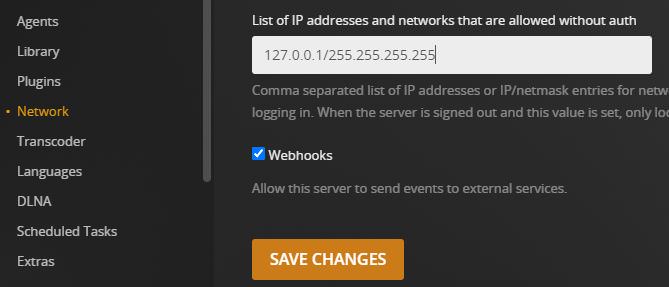
Plex Media Server has an advanced Network setting, “allowedNetworks“, that grants a particular IP address or subnet to access PMS without having to log in. As a word of caution, you should use this sparingly to minimize the risk of having your server accessed by an unauthorized party.
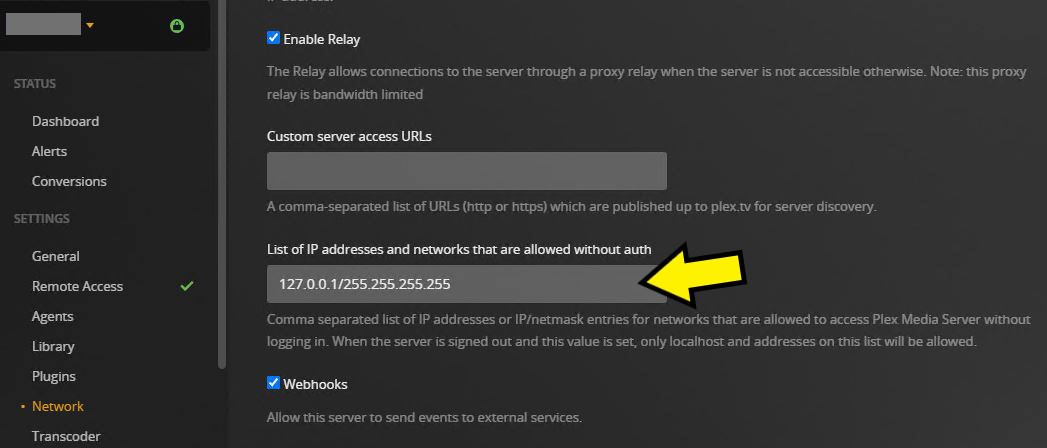
Authentication Bypass IPs/Subnets
For whatever reason, once I had changed my Plex password and chose the option to “sign out connected devices”, each instance of PMS became orphaned and “unclaimed”. The solution was to modify the Preferences.xml file.
First, locate the file in your environment. You can find the list of locations here: PMS Server Data Locations. In my case, our Netgear ReadyNAS runs Debian Linux and the file would be found at /apps/plexmediaserver/MediaLibrary/Plex Media Server.
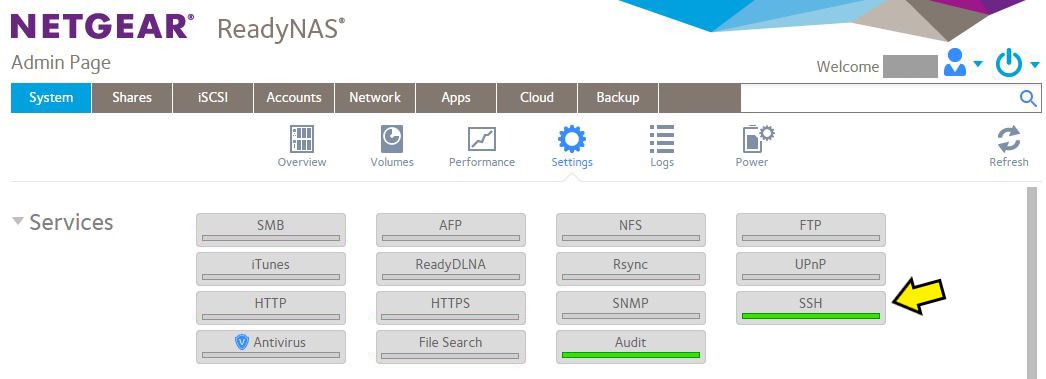
Netgear ReadyNAS: SSH Enabled
I enabled the SSH service for the ReadyNAS under System > Settings > Services, then SSH’ed into it with: ssh root@ip_of_plexserver (ie. ssh [email protected])
Be VERY careful here! The root user you are logged in with can do ANYTHING on the server! Mistype any command, and you could potentially destroy your data and/or configurations!
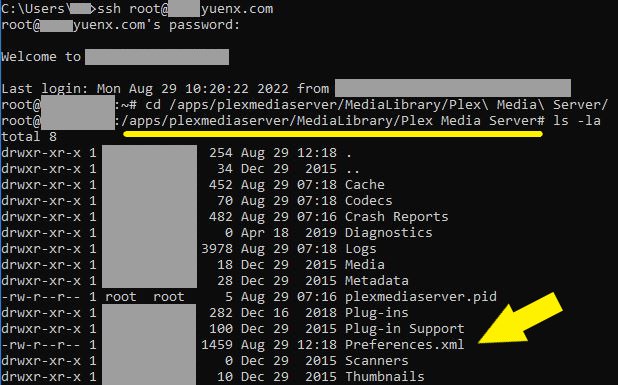
PMS Data Location (Linux)
Get the name of the Plex Media Server service and stop it from running:
systemctl | grep plex
systemctl stop fvapp-plexmediaserver.service
Notice the Plex Media Server service now showing “loaded failed failed” instead of “loaded active running”:
PMS Service Stopped
Make a backup of your Preferences.xml file: cp Preferences.xml Preferences.xml.bak
Edit the Preferences.xml file with the vi command or your favorite text editor: vi Preferences.xml
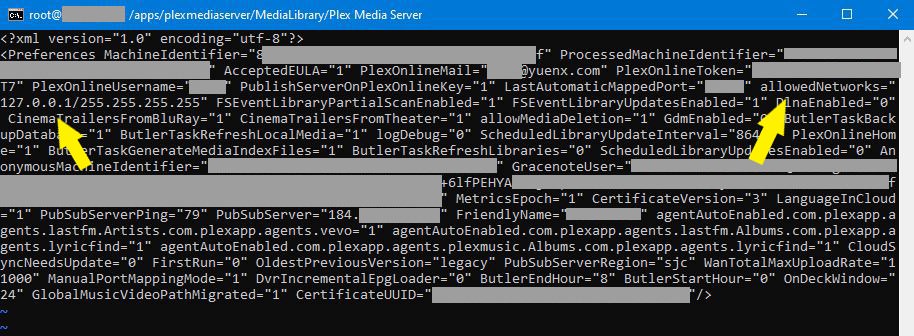
Preferences.xml: allowedNetworks
Locate allowedNetworks and add the IP address of the computer you are configuring PMS from. Keep the “127.0.0.1/255.255.255.255” entry (if it is missing, add it too). If you do not have the “allowedNetworks” option in your configuration file, you may manually add it anywhere within the file’s “<Preferences … />“ section.
If you are going to access a remote PMS over the Internet, also follow the “Claim Remote Server” section.
Examples:
- Allow only your computer (IP of 192.168.123.10): allowedNetworks=”127.0.0.1/255.255.255.255, 192.168.123.10/255.255.255.255″
- Allow any computer in the 192.168.123.x subnet: allowedNetworks=”127.0.0.1/255.255.255.255, 192.168.123.0/255.255.255.0″
- Allow any computer in the 10.x.x.x subnet: allowedNetworks=”127.0.0.1/255.255.255.255, 10.0.0.0/255.0.0.0″
The more specific of an IP or subnet range you add, the more secure the limited access will provide.

192.168.123.10 IP added
Save the Preferences.xml file and start the Plex service: systemctl start fvapp-plexmediaserver.service; systemctl | grep plex
The Plex Media Server service should now show “loaded active running”.
PMS Service Started
Claim Local Server
You must be on the same network as your PMS. If you are not, you may try to temporarily tunnel a SSH session to the remote PMS (detailed under “Claim Remote Server” section below).
Navigate to the local Plex Web App by going to the local IP address of your Plex Media Server, such as https://192.168.123.10:32400/web. It is important you use the server’s local IP and NOT the hostname or the https://plex.tv/web address.
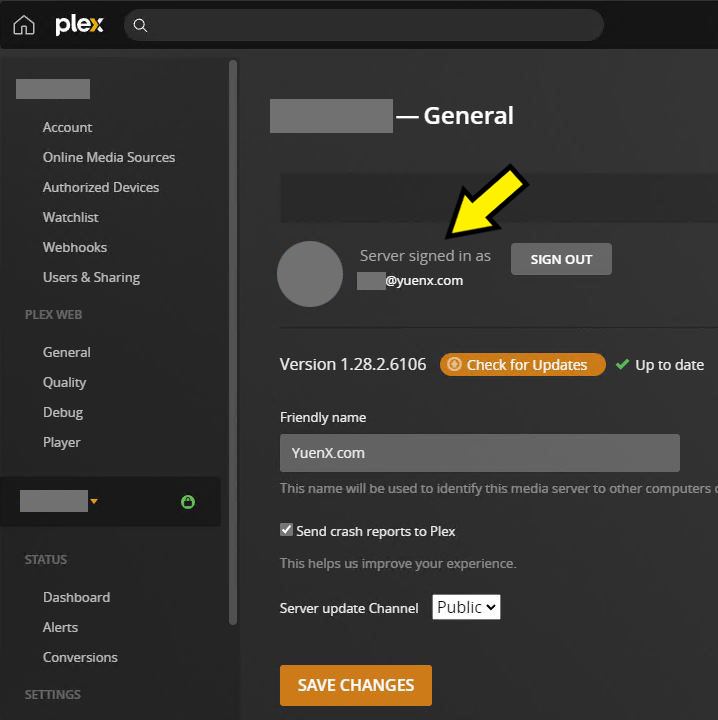
Log in with your Plex credential, then navigate to Settings. You should now see your PMS. Go to its Settings > General to find the “Claim Server” button to re-associate it with your Plex account. In some instances, you may have to visit https://www.plex.tv/claim.
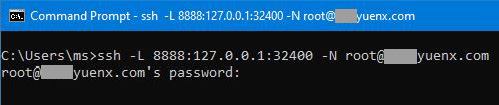
Claim Remote Server
If you need to claim a server that is outside your computer’s network, you will have to establish a temporary SSH tunnel to it (also see Putty method). Since my Netgear ReadyNAS is Debian Linux, I followed Plex’s instructions for that operating system (OS): ssh -L 8888:127.0.0.1:32400 -N root@ip_of_plexserver
Temporary SSH Tunnel
You will have to provide the server’s root credential. Once the password has been correctly entered, there will be no prompt on the screen, and you may access the remote PMS by navigating to http://127.0.0.1:8888/web.
Complete the remaining steps listed under the “Claim Local Server” section above. Once done, exit the temporary SSH tunnel by logging out of the remote session.
Cleanup Tasks
Security should always be a concern for everyone in today’s connected World. Please perform the following cleanup tasks once all your PMS are accessible again.
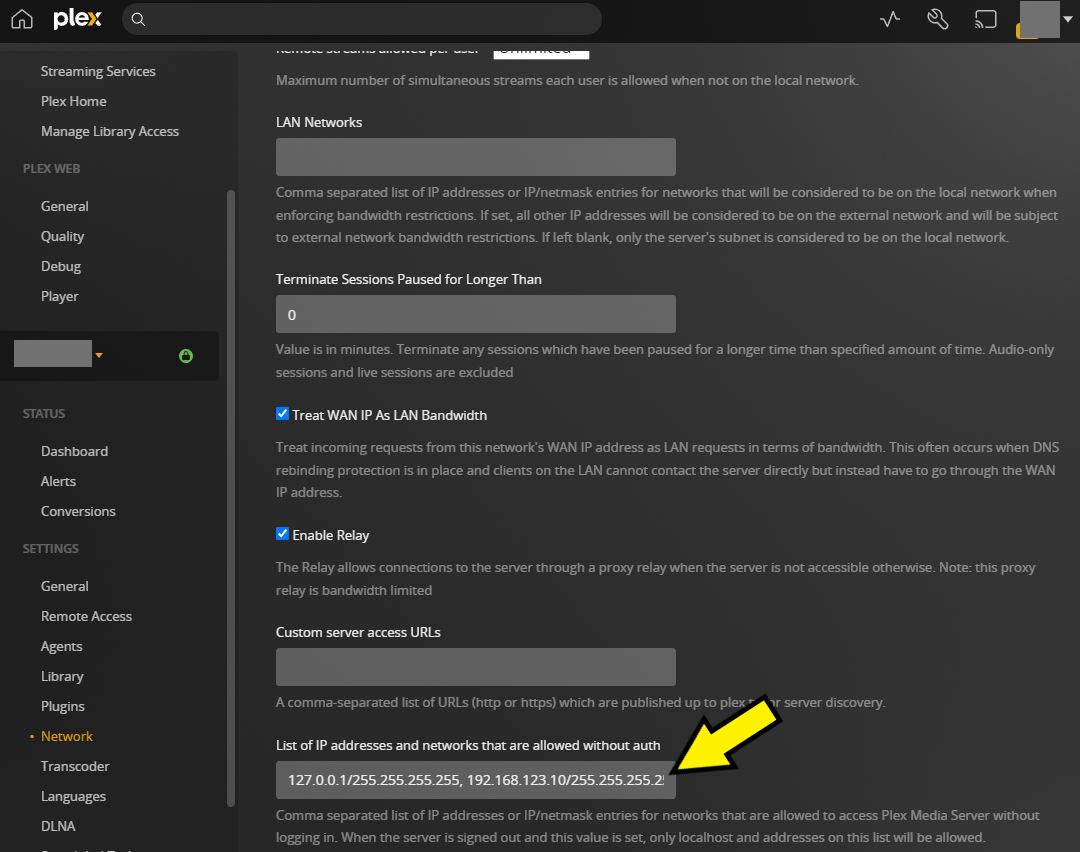
- Remove any additional IP addresses or subnets you added. I only leave the “127.0.0.1/255.255.255.255” in
- Go to Settings > Your Plex Media Server > Settings > Network > “List of IP addresses and networks that are allowed without auth”
- Turn off SSH
- Unless you need SSH running, you should turn it off to keep remote threat actors away from the server
- Turn on Two-Factor Authentication (2FA)
Managed And Shared Access
Your guests and Managed Accounts may no longer have access to your media library. First, I would ask all your guests to have their passwords changed, then you may re-assign them rights to your library by going to Settings > Manage Library Access and/or Plex Home.
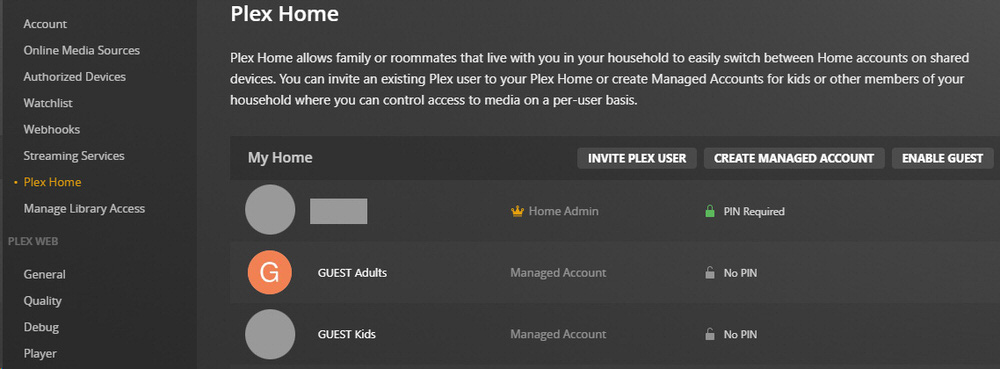
Guests and Managed Accounts
Got Comments?
If you found other ways to get your Plex Media Server working again, share your findings in the Comments!