

Contents
OpenSSL Command Reference
Working with Certificates can be a daunting process as many PKI (Public Key Infrastructure) administrators I know — myself included — were thrusted to manage a complex subject without much training. Adding to the frustration was the unfortunate existence of a lot of misinformation on the subject with implementations that may not necessarily be best practice and/or secure. In fact, I had only encountered less than a handful of individuals during my 20+ years in Information Technology who had a good, proper understanding of PKI.
Looking for Certificate Best Practices? Examine the NIST 1800-16 Special Publication on cert management.
I had been wanting to write a series of comprehensive How-To articles and guidelines about proper certificate management from a Cybersecurity perspective, but the topic is so vast, finding the time to do so outside of my full-time working hours and parenting duties has been a challenge. What I can share with you in this article, however, is a list of common OpenSSL commands a member of the Certificate Services Team may need on a regular basis for cert management and conversions.
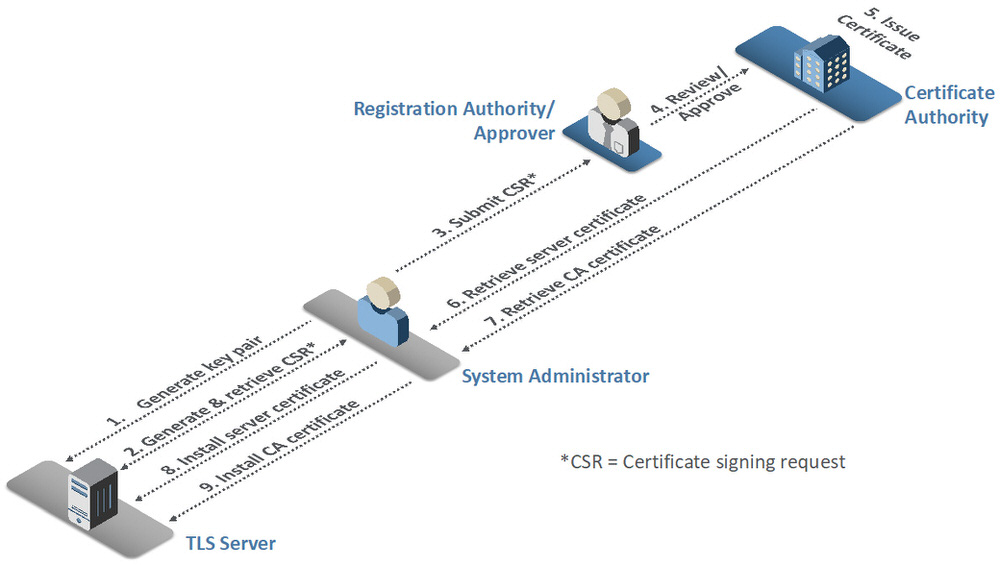
Certificate Signing Request Process /NIST
Again, this post will not cover PKI basics, including what a CSR is, how certificates are signed, and how they are used or installed. Feel free to look at our other YuenX Certificate articles, such as “Export Cert with Non-Exportable Private Key” (where some PKI security topics are provided).
What is OpenSSL?
OpenSSL is a cross-platform tool (and my go-to choice) for generating and completing CSRs (Certificate Signing Requests), creating PKCS#12 (PFX/P12) bundles, converting between different certificate formats; and checking, verifying, or extracting the components of a certificate and its associated Private Key. It works on Windows, Mac OS X, Linux, Unix, and appliances (such as Cisco ASA, Fortinet, Citrix NetScaler, Checkpoint, F5 Big-IP & NGINX). I generally work with Windows machines and use the built-in certreq and certutil utilities, but as many PKI administrators may know, one will at some point receive a request for certificates for a non-Windows server or appliance. Familiarizing yourself with OpenSSL gives you a more universal way to manage certificates across different environments, although you may need to install the tool first.
Where you can download OpenSSL from: OpenSSL.org / OpenSSL for Windows / OpenSSL for Windows by SLProWeb
Getting Help
Once OpenSSL has been installed or is available on your system, take a look at the commands available to get started:
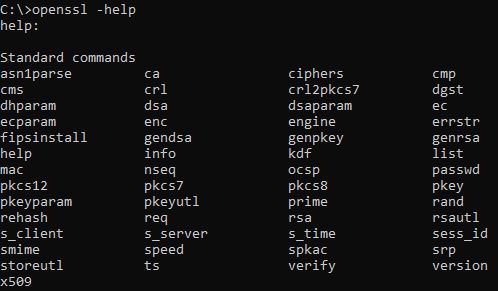
OpenSSL Command Help
- Check your installed OpenSSL version:
openssl version - General help (also see openssl.org):
openssl -help- Cert Requests:
openssl req -help - PKCS#12 File Utility:
openssl pkcs12 -help - Cert Display, Signing, Conversion:
openssl x509 -help - RSA (Private) Key:
openssl rsa -help
- Cert Requests:
Private Key Security
Before we dive into the OpenSSL commands, it is important to know what a Private Key is for and why keeping it secure is ABSOLUTELY important. Some of the commands will leave the Key unencrypted and potentially expose the certificate for nefarious exploits.
A Private Key is generated by the Certificate Owner with the Certificate Signing Request (CSR). Once signed by the Certificate Authority and properly paired, it holds the secret key to unlocking the Certificate and should not be shared. A threat actor could use a compromised Private Key for nefarious reasons, such as those described here (SSLstore) and here (GitGuardian).
Access to Private Keys must be limited to authorized, trained personnel. (NIST “5.1.10 Private Key Security”). Mission-critical systems should have their key stored in a HSM (Hardware Security Module), and Certificate Owners must be trained on proper procedures to keep their private keys secure.
NIST
NIST recommends (“5.1.11 Rekey/Rotation“) that when the Certificate Owner/Administrator is terminated or re-assigned, the Certificates should be replaced with a new CSR/Private Key within 30 days of re-assignment or 5 days of termination unless automation was put in place. The previous certificate, once replaced, must be revoked. Furthermore, unless a valid business reason exists or an automated service is used that removes an administrator from manually accessing private keys, always generate a NEW CSR so a new Private Key is created.
Wildcard certificates, if compromised, pose an even greater threat (NSA).
All certificates should be inventoried. This ensures visibility for monitoring expiration dates, vulnerabilities, compliance and regulatory performance, and allows for more rapid response to large-scale incidents and attacks. (NIST “5.1.1 Inventory“)
Alright, let’s get into OpenSSL.
OpenSSL Commands
When executing the commands, the file extension does not matter if its content is in the correct format. For instance, a PEM file can have a .PEM, .CER, .CRT, .KEY, .TXT, or even .YUENX extension — it does not matter to OpenSSL. Open it up in a text editor, and you will see something like the below gibberish:
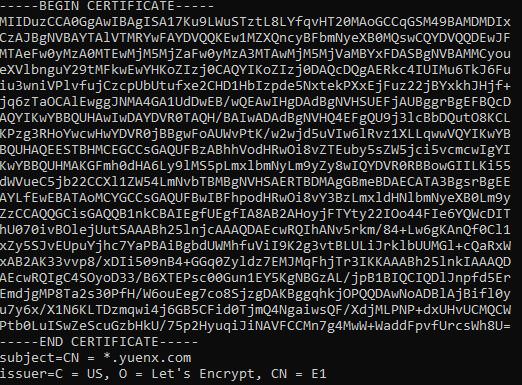
YuenX.com SSL Certificate
You may see content that starts and ends with one of these pairs:
- Certificate: “—–BEGIN CERTIFICATE—–” and “—–END CERTIFICATE—–“
- Unencrypted Private Key: “—–BEGIN PRIVATE KEY—–” and “—–END PRIVATE KEY—–“
- Encrypted Private Key: “—–BEGIN ENCRYPTED PRIVATE KEY—–” and “—–END ENCRYPTED PRIVATE KEY—–“
Go ahead and give it a try! Run this command to check what certificate our website uses: “openssl s_client -connect www.yuenx.com:443”
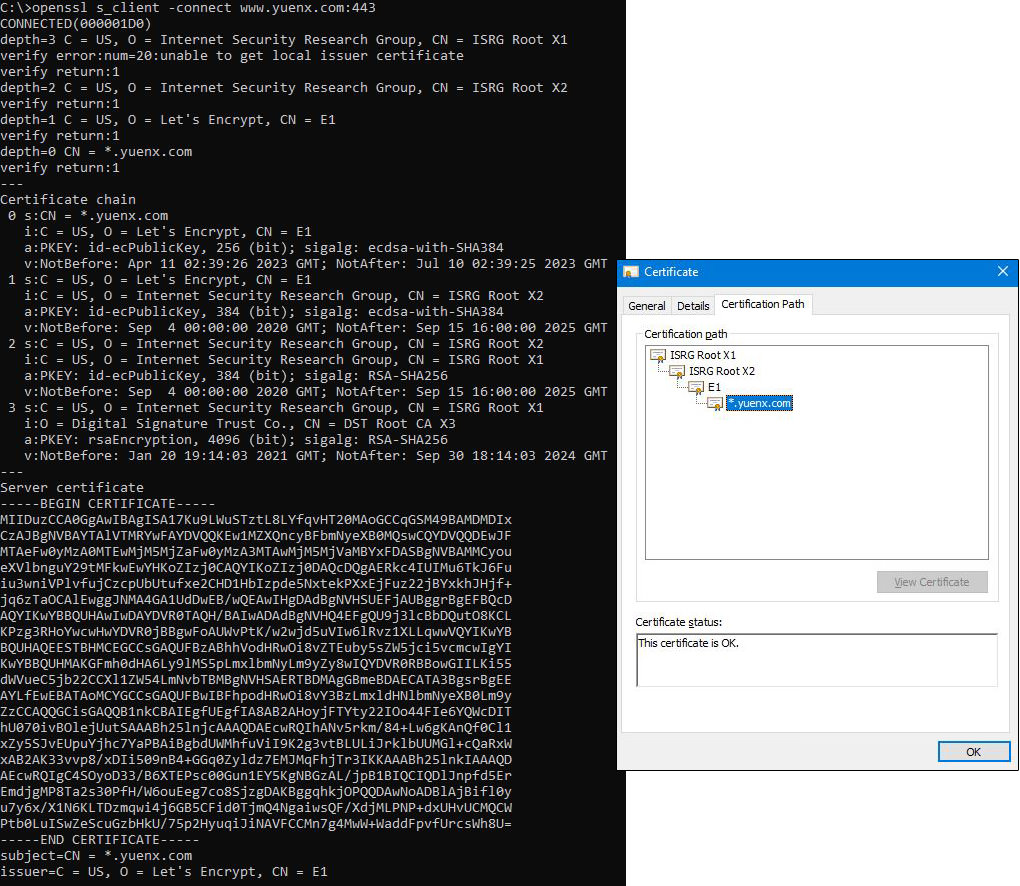
YuenX.com Certificate Chain
The above output shows our site’s 4-level certificate hierarchy starting from “ISRG Root X1” down to the subordinate, issuing “E1” Certificate Authority.
Note: OpenSSL uses the PEM file format as default. Command parameters are case-sensitive.
CSR – Certificate Signing Request
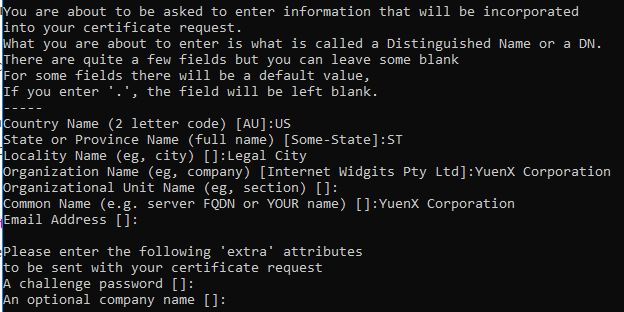
- Generate CSR without SAN. Private Key: generate NEW (best practice is to create a new one for each cert renewal or purchase)
- Command:
openssl req -new -newkey rsa:2048 -out cert.csr -keyout cert-priv-unenc.key -noenc- Private Key: UNENCRYPTED. Warning: -noenc skips encryption and leaves the key file vulnerable to unauthorized access!
- If -noenc does not work, use the deprecated -nodes (NoDES) option
- Encryption strength: rsa:xxxx (where xxxx is 2048, 3072, 4096, etc.)
- Private Key: UNENCRYPTED. Warning: -noenc skips encryption and leaves the key file vulnerable to unauthorized access!
- Command:
Code Signing Certificates: Use the same command as “Generate CSR without SAN” (above), but RSA must be at least 3,072 bits. The Common Name and Organization Name must match the legal name of the company.
OpenSSL CSR: Code Signing Certificate
- Generate CSR with SAN. Private Key: generate NEW (best practice is to create a new one for each cert renewal or purchase)
- Command:
openssl req -new -newkey rsa:2048 -out cert.csr -keyout cert-priv-unenc.key -noenc -config openssl_with_SAN.cnf- Private Key: UNENCRYPTED. Warning: -noenc skips encryption and leaves the key file vulnerable to unauthorized access!
- If -noenc does not work, use the deprecated -nodes (NoDES) option
- -config is told to use the openssl_with_SAN.cnf configuration file. It can contain pre-determined values along with the SAN (listed under the [alt_names] header). See sample file below
- Private Key: UNENCRYPTED. Warning: -noenc skips encryption and leaves the key file vulnerable to unauthorized access!
- Command:
When creating a CSR, you may need to specify Subject Alternate Names (SAN). Modern browsers will throw a “Site is not secure” warning when the SAN is missing from a certificate. Use the -config parameter with a configuration file to include SANs.
[req]
default_bits = 2048
distinguished_name = req_distinguished_name
req_extensions = req_ext

[req_distinguished_name]
commonName                      = Common Name (ie. Server FQDN or domain like yuenx.com)
commonName_default              = yuenx.com
0.organizationName              = Organization Name (ie. Company Name)
0.organizationName_default      = YuenX
countryName                     = Country (2 characters, ie. US)
countryName_default             = US
stateOrProvinceName             = State (ie. CA or California)
stateOrProvinceName_default     = CA
localityName                    = Locality Name (City)
localityName_default            = Los Angeles
organizationalUnitName          = Organizational Unit (ie. IT Cybersecurity)
organizationalUnitName_default  = IT Cybersecurity

[req_ext]
subjectAltName = @alt_names

[alt_names]
DNS.1 = yuenx.com
DNS.2 = www.yuenx.com
- Decode and verify CSR
- Command:
openssl req -verify -noout -text -in cert.csr- You may also use SSLShopper’s online CSR Decoder as a more visual way to check
- -noout does not output copy of CSR so only the human-readable part is shown
- Command:
- Verify SAN values from CSR
- Command
- Linux/Unix:
openssl req -noout -text -in cert.csr | grep DNS - Windows:
openssl req -noout -text -in cert.csr | find "DNS" - Web: SSLShopper CSR Decoder
- Linux/Unix:
- Command
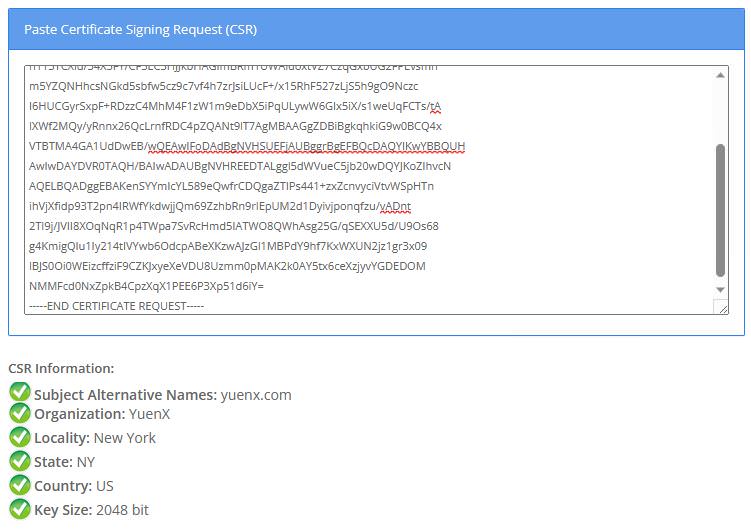
CSR with SAN for YuenX.com /SSLShopper
Certificate Processing
- Check Cert. Output: all readable text
- Command:
openssl x509 -noout -in cert.pem -text - -noout does not output copy of Certs/Private Keys so only the human-readable part is shown
- Command:
- Check Cert. Output: only Subject, SAN, Alias, Emails, Validity dates, Serial number, Issuer (CA)
- Command:
openssl x509 -noout -in cert.pem -subject -ext subjectAltName -alias -email -dates -serial -issuer - -ext subjectAltName may not work on some systems. On Windows, you could also try:
openssl x509 -in cert.pem -text | find "DNS"
- Command:
- Check Cert. Output: only Subject, SAN, Serial number
- Command:
openssl x509 -noout -subject -ext subjectAltName -serial -in cert.pem
- Command:
- Check PKCS#12 (PFX/P12) cert bundle. Output: info + copy of each Cert and Private Key
- Command:
openssl pkcs12 -info -in cert-Bundle.pfx
- Command:
- Verify PKCS#12 (PFX/P12) cert bundle’s Import password
- Command:
openssl pkcs12 -info -in cert-Bundle.pfx -noout
- Command:
- Verify PKCS#12 (PFX/P12) cert bundle’s Import password. Password is specified. Private Key: decrypted
- Command:
openssl pkcs12 -info -in cert-Bundle.pfx -noenc -passin pass:importpw- If -noenc does not work, use the deprecated -nodes (NoDES) option
- Command:
- Check PEM cert chain
- Command:
openssl crl2pkcs7 -nocrl -certfile cert-CAs.pem | openssl pkcs7 -print_certs -noout
- Command:
- Extract all Certs from PKCS#12 (PFX/P12) cert bundle as PEM. Private Key: not output
- Command:
openssl pkcs12 -in cert-Bundle.pfx -out cert-publ.pem -nokeys
- Command:
- Extract only Client Certs from PKCS#12 (PFX/P12) as PEM. Private Key: not output
- Command:
openssl pkcs12 -in cert-Bundle.pfx -out cert-Client.pem -nokeys -clcerts
- Command:
- Extract only CA Certs from PKCS#12 (PFX/P12) as PEM. Private Key: not output
- Command:
openssl pkcs12 -in cert-Bundle.pfx -out cert-CAs.pem -nokeys -cacerts
- Command:
Tip: Check out DigiCert’s SSL Installation Diagnostic Tool to help with troubleshooting or gathering details about a publicly accessible certificate.
Private Key
Warning: Private Keys must be safeguarded from unauthorized access! Be mindful of what each command does with the key, who may be watching, and/or who or what may be logging the command session and/or output.
- Verify Private Key. Output: verification status only
- Command:
openssl rsa -check -noout -in cert-priv.key- -noout does not output copy of Private Keys
- Command:
- Extract Private Key from PKCS#12 (PFX/P12) cert bundle. Output: Private Key as PEM encrypted with new passphrase
- Command:
openssl pkcs12 -in cert-Bundle.pfx -out cert-priv.key -nocerts
- Command:
- Extract Private Key from PKCS#12 (PFX/P12) cert bundle. Output: Private Key as PEM without encryption
- Command:
openssl pkcs12 -in cert-Bundle.pfx -out cert-priv-unenc.key -nocerts -noenc- Private Key: UNENCRYPTED. Warning: -noenc skips encryption and leaves the key file vulnerable to unauthorized access!
- If -noenc does not work, use the deprecated -nodes (NoDES) option
- Private Key: UNENCRYPTED. Warning: -noenc skips encryption and leaves the key file vulnerable to unauthorized access!
- Command:
- Extract Private Key from PEM cert bundle. Output: Private Key as PEM without encryption
- Command:
openssl rsa -in cert-Bundle.pem -out cert-priv-unenc.key- Private Key: UNENCRYPTED. Warning: -noenc skips encryption and leaves the key file vulnerable to unauthorized access!
- If -noenc does not work, use the deprecated -nodes (NoDES) option
- Private Key: UNENCRYPTED. Warning: -noenc skips encryption and leaves the key file vulnerable to unauthorized access!
- Command:
- Remove Private Key’s encryption. Output: Private Key as PEM without encryption
- Command:
openssl rsa -in cert-priv.key -out cert-priv-unenc.key- Private Key: UNENCRYPTED. Warning: leaves the key file vulnerable to unauthorized access!
- Command:
Conversion
- PEM (Client + CA Certs + Private Key) to PKCS#12 (PFX/P12)
- Command:
openssl pkcs12 -export -out cert-Bundle.pfx -inkey cert-priv.key -in cert-Client.pem -certfile cert-CAs.pem- Combine Root & Subordinate CA files into one first (cert-CAs.pem) because -certfile will only attach one file when multiple are provided. You cannot use “-certfile cert-rootCA.pem -certfile cert-subCA.pem“, for example
- Command:
- PEM (Client + CA Certs + Private Key) to PKCS#12 (PFX/P12). Import password is specified
- Command:
openssl pkcs12 -export -out cert-Bundle.pfx -inkey cert-priv.key -in cert-Client.pem -certfile cert-CAs.pem -password pass:importpw- -password (when used with -export) is the same as -passin
- Command:
- PEM (Client + CA Certs + Private Key) to PKCS#12 (PFX/P12). Import & Export passwords are specified
- Command:
openssl pkcs12 -export -out cert-Bundle.pfx -inkey cert-priv.key -in cert-Client.pem -certfile cert-CAs.pem -passin pass:importpw -passout pass:exportpw- -passin specifies Import password (to read the encrypted Private Key), -passout is the Export password to be set onto the new PFX
- Command:
- PEM (Client/CA Cert Bundle) to PKCS#12 (PFX/P12). Import & Export passwords are specified
- Command:
openssl pkcs12 -export -out cert-Bundle.pfx -inkey cert-priv.key -in cert-Bundle.pem -passin pass:importpw -passout pass:exportpw
- Command:
- PKCS#12 (PFX/P12) to PEM Bundle. Output: (Client + CA Certs) + Private Key (encrypted with new PEM passphrase)
- Command:
openssl pkcs12 -in cert-Bundle.pfx -out cert-Bundle.pem
- Command:
- PKCS#12 (PFX/P12) to PEM Bundle. Output: (Client + CA Certs) + Private Key (encrypted with new PEM passphrase). Import & Export passwords are specified
- Command:
openssl pkcs12 -in cert-Bundle.pfx -out cert-Bundle.pem -passin pass:importpw -passout pass:exportpw- -passin specifies Import password (to read the PFX), -passout is the Export password to be set onto the new PEM Bundle
- Command:
- PKCS#12 (PFX/P12) to PEM Bundle. Output: (Client + CA Certs) + Private Key (unencrypted)
- Command:
openssl pkcs12 -in cert-Bundle.pfx -out cert-Bundle-unenc.pem -noenc- Private Key: UNENCRYPTED. Warning: leaves the key file vulnerable to unauthorized access!
- If -noenc does not work, use the deprecated -nodes (NoDES) option
- Private Key: UNENCRYPTED. Warning: leaves the key file vulnerable to unauthorized access!
- Command:
- PKCS#12 (PFX/P12) to PEM. Output: Client + CA Certs only (No Private Key)
- Command:
openssl pkcs12 -in cert-Bundle.pfx -out certs.pem -nokeys
- Command:
- PKCS#12 (PFX/P12) to PEM. Output: Private Key only (unencrypted)
- Command:
openssl pkcs12 -in cert-Bundle.pfx -out cert-priv-unenc.key -noenc -nocerts- Private Key: UNENCRYPTED. Warning: leaves the key file vulnerable to unauthorized access!
- If -noenc does not work, use the deprecated -nodes (NoDES) option
- Private Key: UNENCRYPTED. Warning: leaves the key file vulnerable to unauthorized access!
- Command:
- DER to PEM
- Command:
openssl x509 -inform der -in cert.cer -out cert.pem
- Command:
- PEM to DER
- Command:
openssl x509 -outform der -in cert.pem -out cert.cer
- Command:
Final Thoughts
Learning how to use OpenSSL can be both powerful and a timesaver as the commands could be incorporated into a script for automation and consistency. It also is available across a variety of platforms, including Windows, Mac OS X, Linux, Unix, and appliances. Please do keep in mind that Private Keys must be stored securely and access to them should be limited to authorized, trained users only. For more, Certificate Best Practices, head on over to the NIST 1800-16 Special Publication.
Credits:
– Featured Image by Christopher Burns via Unsplash
References
- NIST: TLS Server Certificate Management
- SSLShopper: Most Common OpenSSL Commands
- DigiCert: OpenSSL Quick Reference Guide
- CryptoBook: RSA Key Strengths and Concepts
- Mark Brilman: Convert PFX to a Separate Key/CRT File
Related Posts
- Certificate Security: Export Cert with Non-Exportable Private Key / Marked as “Not Exportable” (Windows PKI)
- FortiManager: CA-Signed Web Admin Certificate
- Google Chrome: Revoked Web Certificates