
Contents
FireMon Single Sign-On
Long time ago, I was engaged with FireMon’s technical team to gain a better understanding of our network environment. The goal was to improve security, increase network efficiency, and automate some workflows. I also wanted to implement Single Sign-On (SSO) for better identity and access management (IAM) and to enforce multi-factor authentication (MFA) with Azure Active Directory (AzAD or AAD). Unfortunately, FireMon’s documentation on SAML configuration was extremely barebone, not helpful at all, and their technical team did not have the understanding of how to set it up with AAD.
Every configuration we attempted resulted in the test user getting logged off immediately after passing Microsoft’s MFA authentication prompt.
I suspected the issue to have been on the FireMon side as a SAML trace revealed the information sent over by AAD was correct. Did FireMon expect one or more AAD Claims as certain names or in specific ways? Both sides must match for SSO to work. The FireMon Security Manager log additionally showed that it did not receive any value for the Group claim despite the SAML token containing the expected information.
To look at the FireMon Security Manager log, SSH into the FM app server and type: “fmos logview /var/log/firemon/sm/secmgr.log“. Then push Shift-G to go to the end of the log.
Thankfully, I had configured plenty of Azure AD SSO in my past roles as a systems engineer, and together with a colleague with the appropriate rights in our AAD tenant, we aimed to figure out the SAML configuration on our own. The possible culprit: Claims information exchange between both systems.
Configure SSO with Azure AD
Let’s go over how to configure FireMon SSO with Azure AD from the beginning. The steps will alternate between the FireMon and Azure AD admins’ responsibilities.
Step A – FireMon Admin
- Log in to the FireMon App server and create a SAML Authentication Server by going to Administration > Access > Authentication Servers > Create > SAML
- Provide the new Authentication Server a name, such as “YuenX Azure AD SAML”
- Under SAML Metadata Generator, provide a unique name as Entity ID. It is important that this ID does not already exist in Azure AD
- Entity ID Example: https://fmonapp.yuenx.com/sp or “FireMon SSO” – as long as it’s unique in AAD
- Service Provider Host Name: Use the base DNS name of where the FireMon App login screen is accessible from, such as fmonapp.yuenx.com
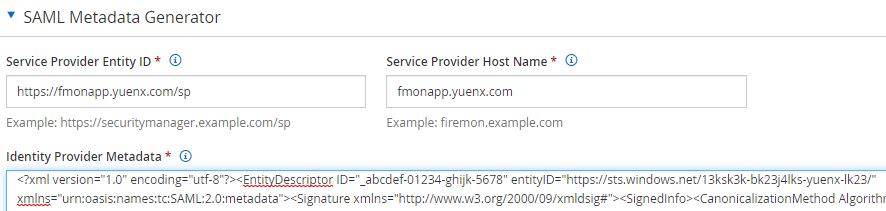
FireMon: SAML Metadata Generator
- Next step is to obtain the Azure AD-side (IDP) Federation Metadata XML
Step B – Azure AD Admin
- Create a new Azure AD Enterprise Application and give it a name, such as “FireMon”
- Under “Basic SAML Configuration”, provide any temporary text for the Entity ID and Reply (ACS) URL fields. This will automatically be replaced later
- Save the new application and send the (IDP) Federation Metadata XML file to the FireMon admin
Step C – FireMon Admin
- Open the (IDP) Federation Metadata XML file with Notepad. Copy and paste its content into the FireMon “Identity Provider Metadata” textbox under “SAML Metadata Generator”
FireMon: SAML Metadata Generator
- Click “Save & Generate Service Provider Metadata”
- You should see a pop-up stating that the information has been saved. However, due to a bug at the time of this writing, you will have to refresh the browser (or go back to the list of Authentication Servers > edit the newly-created server) to see the “Service Provider Metadata” textbox populated
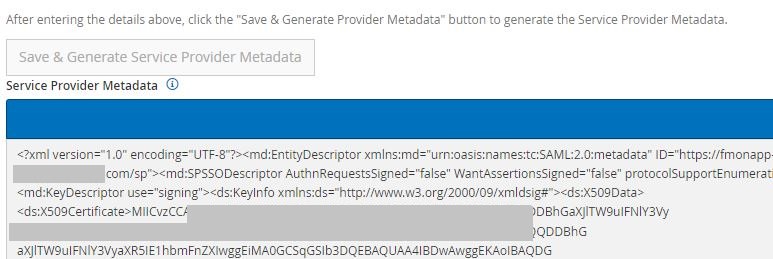
- Copy and paste the (SP) Service Provider Metadata XML content into a text file, such as “FireMon SP Metadata.xml”, and send it to the Azure AD Admin
Step D – Azure AD Admin
- Upload the (SP) Service Provider Metadata XML file to the newly-created AAD enterprise app (under Single Sign-On > Upload metadata file)
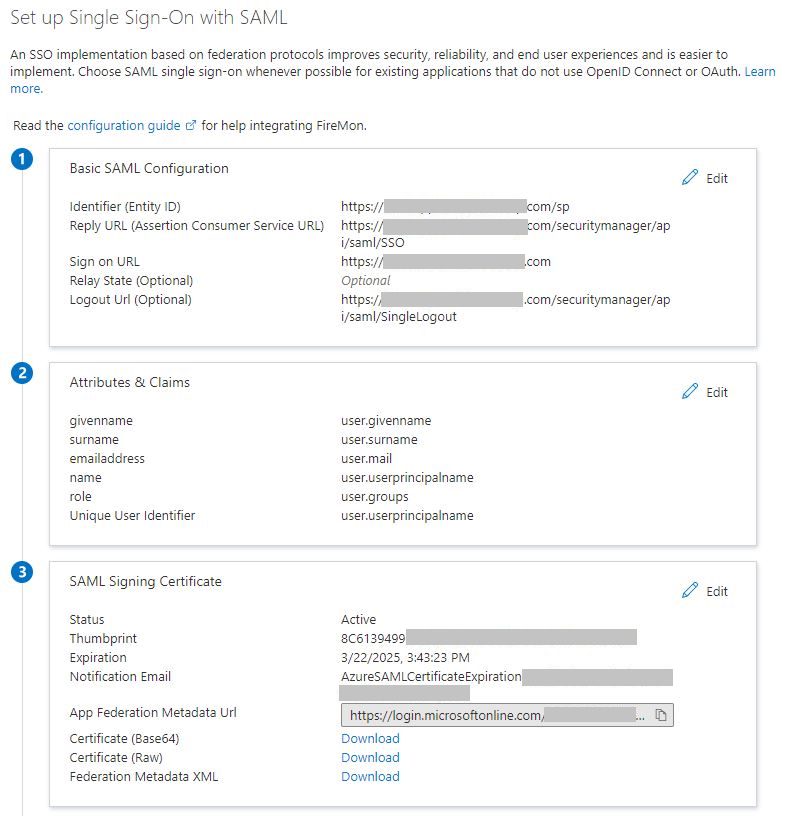
- The Basic SAML Configuration section should now be populated as follows:
- Entity ID
- Same as “Entity ID” entered by the FireMon Admin under Step A (ie. “https://fmonapp.yuenx.com” or “FireMon SSO“)
- Reply URL
- Should be “https://serviceProviderHostName.fqdn/securitymanager/api/saml/SSO“, where serviceProviderHostName.fqdn is the same as “Service Provider Host Name” entered by the Firemon Admin under Step A (ie. “https://fmonapp.yuenx.com/securitymanager/api/saml/SSO“)
- Sign on URL
- The Sign-on URL serves a very specific scenario and is entirely optional for FireMon SSO
- In fact, it does nothing for our use case here and can be left blank. I am only including it as a FYI for the AAD or FireMon Admin on what URL to browse to for SSO login
- Enter the same address as the Reply URL, but without “/securitymanager/api/saml/SSO”, such as “https://fmonapp.yuenx.com“
- The Sign-on URL serves a very specific scenario and is entirely optional for FireMon SSO
- Logout URL
- Should be “https://serviceProviderHostName.fqdn/securitymanager/api/saml/SingleLogout“
- Entity ID
Step E – Agree on SAML Claim Format
This step was the missing key to get SSO to work. The issue we had was that Microsoft Azure AD sent the Claims in a specific format that FireMon did not expect. This is where the FireMon and Azure AD admins need to agree on what format to use: AAD’s default schema or create a custom one. For illustration purposes, I will include instructions for both.
Azure AD must send Claims in a format that FireMon expects and understands. On the flipside, FireMon must be able to interpret Claims in the format that Azure AD sends. Both sides must speak the same language and use the same terminology for SSO to work.
Azure AD: SSO Configuration
Azure AD, by default, issues Claims in the format of “http://schemas.xmlsoap.org/ws/2005/05/identity/claims/claimname“. So, either we have FireMon expect Claims the same way or we create custom ones in AAD. Both sides must use the same format to be successful. In the above screenshot, I left the emailaddress, givenname, name, and surname claims as AAD’s default (“http://schemas.xmlsoap.org/…”). Only the “role” Group Claim was customized. Here is how:
Azure AD Admin
- Create a new Group Claim
- Groups associated with the user to return in the claim: “Groups assigned to the application”
- This ensures that only the group name(s) assigned to the Enterprise Application that the user also is part of gets passed on with the SAML token. We will configure those groups in the next steps
- Source attribute: sAMAccountName
- Advanced Options > Customize the name of the group claim > Name (required): “role“
- This ensures that only the group name(s) assigned to the Enterprise Application that the user also is part of gets passed on with the SAML token. We will configure those groups in the next steps
- Go to the Enterprise Application’s “Users and groups” and add the AD groups you wish to grant FireMon access to.
- Be mindful that the AAD Admin will be shown the Display Name of the group and not its sAMAccountName (what the FireMon Admin sees)
- Examples: IT-Ops.SecurityEngineers, IT-Ops.Infrastructure.SysEngineers
- Under the Enterprise Application’s Manage > Properties, you may have to set these options as per your company’s standards:
- Assignment required? No
- Visible to users? No
Azure AD: SSO Configuration
FireMon Admin
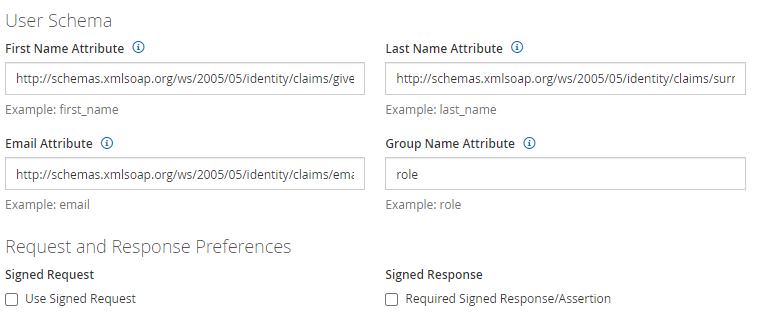
- Go to Authentication Server’s SAML Settings > User Schema.
- The values to be entered must match exactly what both admins agreed upon for each Claim name and format. If it was “http://schemas.xmlsoap.org/ws/…”, use that. If it was a custom Claim, like “role”, use that.
- Here is what the values should be based on the Attributes & Claims screenshot found at the beginning of this Step E:
- First Name Attribute: http://schemas.xmlsoap.org/ws/2005/05/identity/claims/givenname
- Last Name Attribute: http://schemas.xmlsoap.org/ws/2005/05/identity/claims/surname
- Email Attribute: http://schemas.xmlsoap.org/ws/2005/05/identity/claims/emailaddress
- Group Name Attribute: role
FireMon: User Schema
Let’s map what roles each AD group should be assigned upon logging in to FireMon.
- Under User Group Mapping, map the appropriate AD Group’s sAMAccountName to the role you want to assign
- Examples:
- Role: Security Engineers > Edit > Including authenticated users from SELECTED authentication server groups > Authentication Server Group: IT-Ops.SecurityEngineers (sAMAccountName of the AD group to add)
- Role: Network Engineers > Edit > Authentication Server Group: IT-Ops.Infrastructure.SysEngineers
Step F – Test SSO
- From an Incognito/InPrivate browsing session, go to the FireMon App URL, such as “https://fmonapp.yuenx.com”
- The Firemon SSO login redirect countdown will be shown
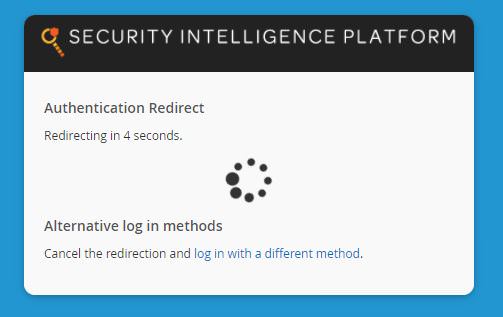
FireMon: Authentication Redirect
- You should now be logged on to FireMon, if the account is Enabled, has been given access, and has been assigned a FireMon role
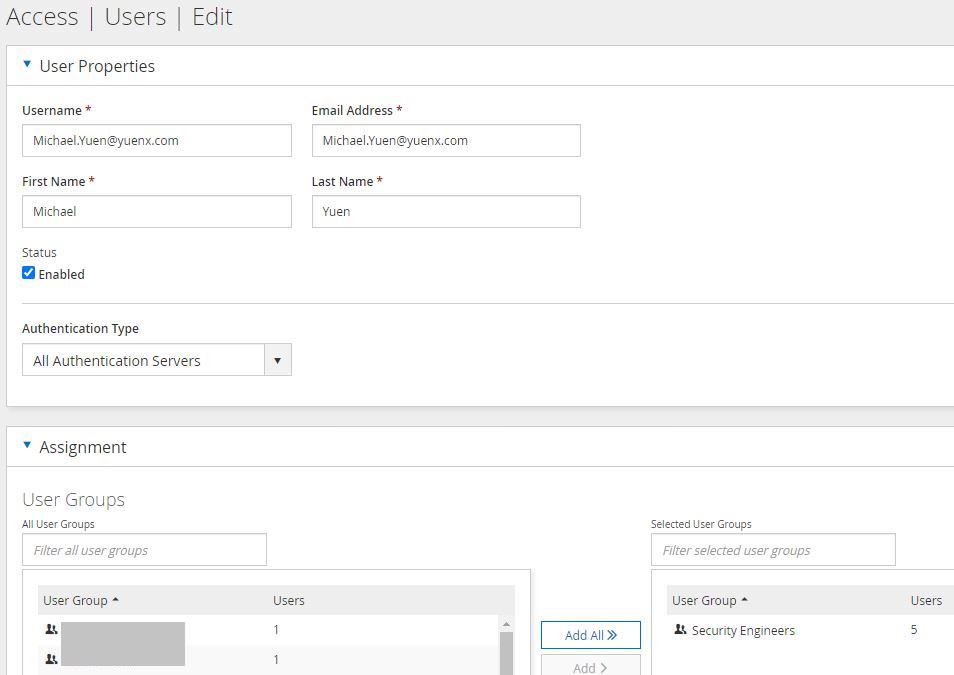
Step G – Verify Account Details
FireMon does just-in-time user provisioning. That means that if an account did not already exist in FireMon, it will automatically be created with the information sent over with the AAD SAML token. The appropriate FireMon role is also automatically granted, if the account is part of the AD Group for which a responsibility was mapped. If the user DID already exist, its details (ie. Last Name) and role will be updated according to the information contained within the SAML token.
- Go to Access > Users
- You should see the test user’s account from Step F populated with his/her First Name, Last Name, and Email Address as it appears in Azure AD
- If the account previously existed, any misspelling in the First/Last Name or Email Address would be overwritten with what the SAML token passed on from AAD
- Edit the test user’s account and look under Assignment: the mapped FireMon role should be assigned under “Selected User Groups”
FireMon: SSO User Details
References
- FireMon SupportCenter: Troubleshoot Azure SAML Integration (Account required)
Related Posts
- Cisco Umbrella: SSO Login Issues
- Proofpoint TAP: SAML SSO Configuration with Azure Active Directory