
Contents
Proofpoint SSO Challenges
Proofpoint, despite its solid product portfolio, has not always had the best articles on how to configure single-sign on (SSO) with their systems. Take for instance a six-month long back-and-forth between Proofpoint, Microsoft, and myself in getting one of their products to provide SSO in a way that was secure for their customer (my employer at the time). Proofpoint wanted far more access to my company’s Azure Active Directory (AD) and Active Directory environments than was needed.
My more secure SSO proposal was blessed by both Microsoft, senior team members, and our IT security teams, but Proofpoint (and their escalation engineer) continuously rejected it claiming that our design was not supported. We ultimately proved them wrong after insisting that their company try our design.
Setting up SSO for Proofpoint Targeted Attack Protection (TAP) with Azure AD unfortunately was not smooth either as a simple how-to was not available. There were generic, disjointed, or outdated guides found, but in this article, I will attempt to summarize how I got SAML working for my current employer.
What are Proofpoint TAP and SSO?
Proofpoint Targeted Attack Protection (TAP)
According to Proofpoint, TAP “helps you stay ahead of attackers with an innovative approach that detects, analyzes and blocks advanced threats before they reach your inbox.”
- “Ransomware and other advanced email threats delivered through malicious attachments and URLs”
- “Zero-day threats, polymorphic malware, weaponized documents and phishing attacks”
- Threat and risk detection in cloud apps
- “Connecting email attacks related to credential theft or other attacks”, including VIP persons like executives
Single-Sign On
Single-Sign On (SSO) allows for an individual to sign into one or more services with one account and password instead of having one for each resource. In addition, administrators can better manage access to resources through a central identity provider (IdP), such as Azure AD, and enforce policies like multi-factor authentication, auditing, and compliance rules.
SSO Configuration
For the purpose of this article, the Identity Provider (IdP) is Azure Active Directory (AAD/AzAD). Note that at my current employer as part of the IT Cybersecurity team, separation of duties prevents us from having full Azure AD rights. As such, I was unable to retrace the exact steps taken and have written some from memory.
IdP (Identity Provider) Setup
- Log in to Azure AD and go to Enterprise Applications
- Click on “New Application” and choose either one:
- Add from Gallery and find “Proofpoint on Demand” (or)
- Manually create a new app
Azure AD: Enterprise Application
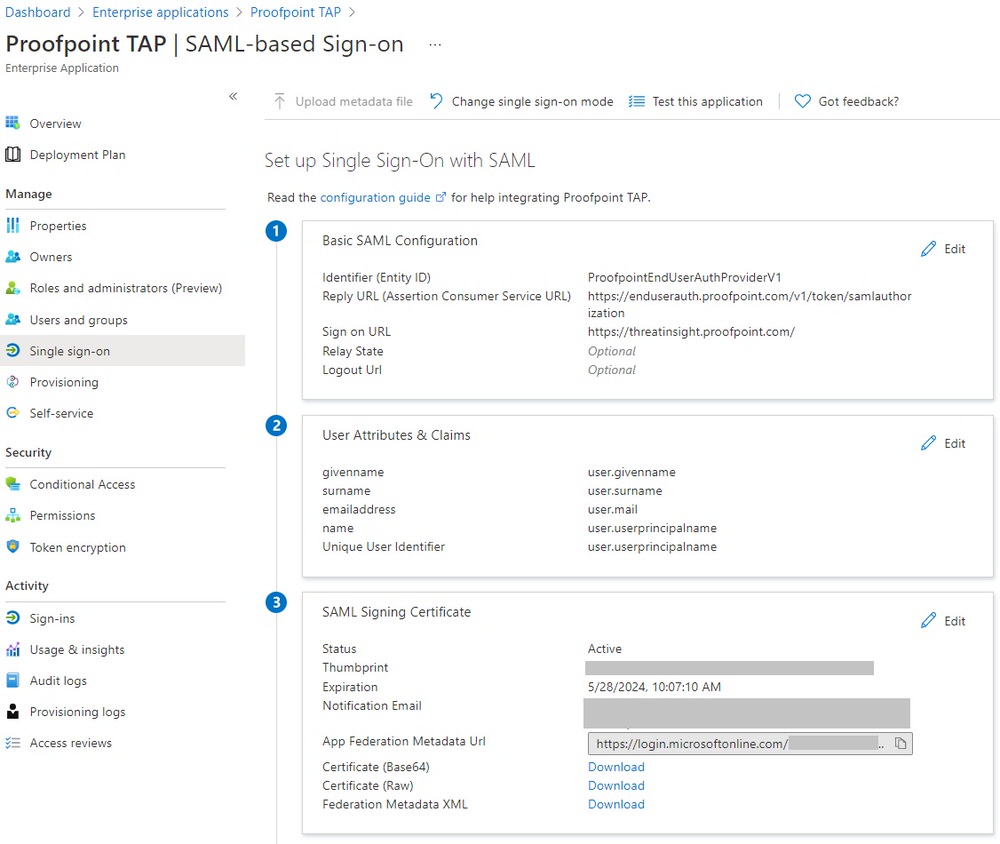
- Provide the following for the SAML Configuration:
- Entity ID: ProofpointEndUserAuthProviderV1
- This must be unique within the Azure AD tenant
- Reply/ACS URL: https://enduserauth.proofpoint.com/v1/token/samlauthorization
- Sign-on URL: https://threatinsight.proofpoint.com
- Proofpoint tech support asked for us to use the same URL as Reply/ACS, but that is incorrect. The above URL is what is appropriate for Service Provider-initiated SSO
- Entity ID: ProofpointEndUserAuthProviderV1
Azure AD: SAML Configuration
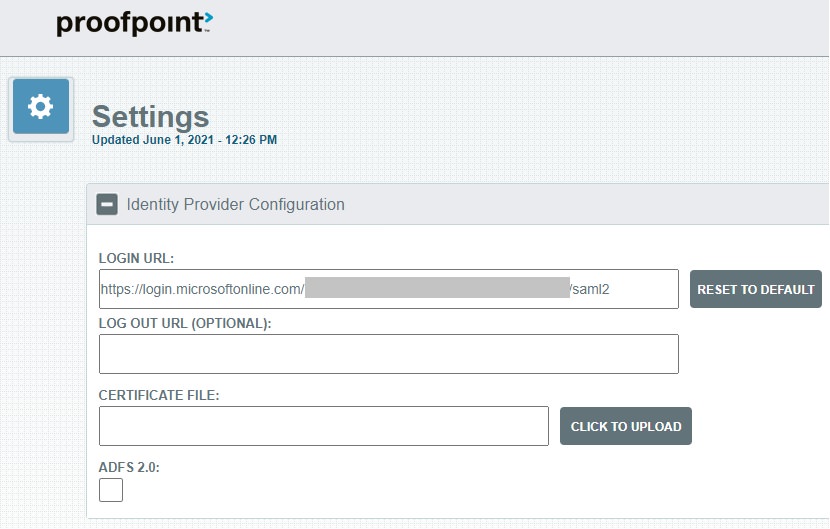
- Download the SAML Signing Certificate in Base64 format
- Make note of the “Login URL” found under the “Set up Proofpoint on Demand” section
- Example: “https://login.microsoftonline.com/<string of numbers and letters>/saml2″
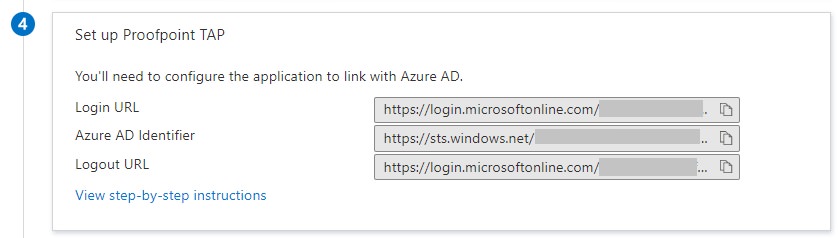
Azure AD: Login URL
- If app was added from the Gallery, rename “Proofpoint on Demand” to “Proofpoint TAP“
- Assign the appropriate User Assignments and Conditional Access policies
- Adding users and/or groups will only enable SSO from the Azure AD side. An admin will have to manually pre-create the users on the Proofpoint side using their UserPrincipalName (usually the email address)
- Proofpoint TAP does not support Just-in-Time account provisioning. In other words, if the account does not exist on the Proofpoint side, the user will receive an error after having authenticated to Azure AD
- Adding users and/or groups will only enable SSO from the Azure AD side. An admin will have to manually pre-create the users on the Proofpoint side using their UserPrincipalName (usually the email address)
SP (Service Provider) Setup
Proofpoint Dashboard
- Provide the following:
- Login URL: (Azure AD Login URL recorded in the IdP Setup section)
- Certificate File: (Upload the Base64-encoded SAML Signing Certificate from the IdP Setup section)
- Make note of the SAML Signing Certificate expiration date as the Proofpoint Dashboard does not show it nor will the admin be notified. I had already put in an Enhancement Request ticket to address this
- Only the Azure AD admin will receive a notification from the Microsoft end
- SSO will fail, according to Proofpoint technical support, when the cert expires with no obvious way for the Proofpoint admin to see that date anywhere
- Make note of the SAML Signing Certificate expiration date as the Proofpoint Dashboard does not show it nor will the admin be notified. I had already put in an Enhancement Request ticket to address this
Account Creation
Proofpoint TAP does not support Just-in-Time account provisioning. An admin will have to manually pre-create the users on the Proofpoint side using their UserPrincipalName (usually the email address). In other words, if the account does not exist on the Proofpoint side, the user will receive an error after having authenticated to Azure AD
- Go to the Proofpoint TAP console at: https://threatinsight.proofpoint.com
- Settings > Privileges
- Add admins using their UserPrincipalName (usually the email address) and assign the appropriate access Role
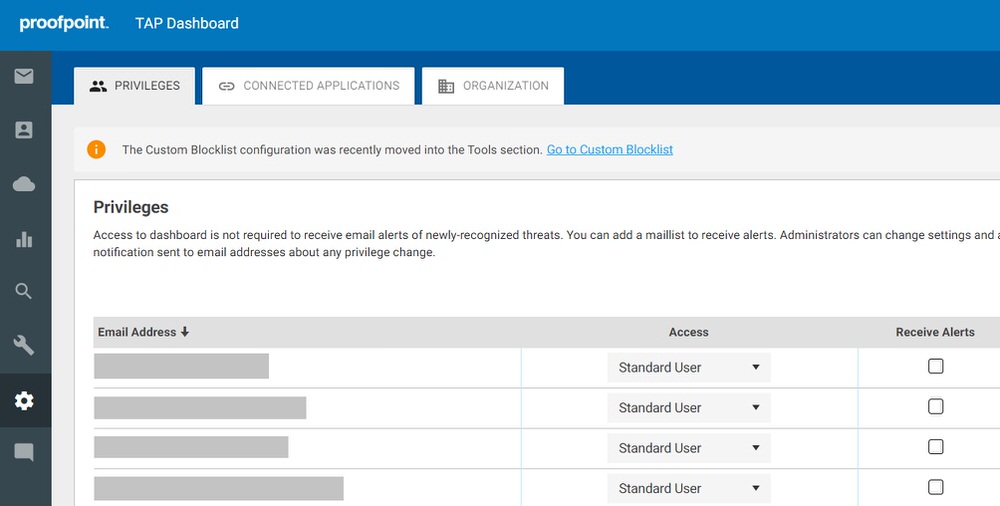
Proofpoint TAP: Account Privileges
Test SSO
- Go to the Proofpoint TAP console at: https://threatinsight.proofpoint.com
- Type in the user’s UserPrincipalName (usually the email address)
- User will be prompted to authenticate to Azure AD
- If the UserPrincipalName passed by the Azure AD SAML token matches the Email address on the Proofpoint TAP side, the user will be logged in
Related Posts
- Cisco Umbrella: SSO Login Issues
- FireMon: How to Configure SAML SSO with Azure Active Directory